How To Maintain Shower Head?
Posted on Sep 13, 2022

How long has it been since you cleaned your bathroom? You most likely scrubbed the toilet, wiped the tile, mopped the floors, and cleaned the sinks. Did you touch the shower head? In most cases, the answer is no.
When it comes to cleaning, most homeowners focus on surfaces or other products, but showerheads are frequently overlooked. Minerals can build up in any showerhead after repeated use.
Shower heads that are dirty and clogged can ruin the good shower sets. Instead of replacing your showerhead, we have the perfect solution for how to clean a showerhead quickly and easily.
Before that, To remove tough-to-clean buildup in the shower head, you will need the following materials cleaning cloth, pliers, wrench, bowl, a distilled white vinegar solution, needle, and brush.
Top Tips To Maintain Shower Head
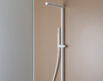
Detach The Shower Head
Since most shower heads are screwed or detachable, replacing them is usually quick and simple. Don’t worry if you have a fixed-on head; cleaning those is also possible. While cleaning shower heads that have been installed rather than removed makes cleaning more accessible and more convenient, the only difference with fixed-on heads is that you need a professional to clean inside them.
Soak In Vinegar
Since white vinegar contains acetic acid, it is the best natural cleaning product. When it comes to cleaning the grime off the head, this easily available kitchen item is fantastic. A plastic bag should be carefully filled with three cups of white vinegar and one-fourth cup of baking soda. To prevent it from coming off due to the weight of the vinegar, make sure to tie the bag tightly around the top of the head.
Unless you have a showerhead made of brass or gold, let specialty metals like brass or gold soak for no longer than 30 minutes. Longer duration might undermine the conclusion. Remove the bag after the showerhead has had time to soak, then carefully pour the vinegar and baking soda solution down the drain. Adjust the shower’s temperature and run the water for a few minutes to flush out any last traces of cleaning agent or mineral deposits.
Nozzles Should Be Scrubbed.
Brushing the nozzles with a soft toothbrush is the best way to remove mineral deposits. Use a gentle cleanser if the rubber or plastic is dirty or discolored. Additionally, by doing this, you can increase your water pressure and guarantee a steady stream of warm water when you take a shower. Plastic nozzles, on the other hand, usually necessitate using a toothpick to break down deposits. After poking each plastic nozzle, rinse the debris. Use a microfiber cloth to polish the showerhead and avoid water stains.
Replacing And Rinsing
You can wash the exteriors under a sink faucet; the shower head nozzles need water running through them to clear out debris. Avoid wasting water because it will only take a few seconds to clean the nozzles! Check to see if all of the nozzles are clear. Keep an eye on the water pressure because, if some nozzles are still blocked, it may not have increased as much as you had hoped.
Clean Up The Exterior
Any metal, particularly bathroom fixtures, can become dull and stained by limescale, water spots, and grime. You’ll see that your shower head is susceptible to many of these things and needs to be cleaned frequently. Depending on the metal, a mild cleaning solution will remove all stains on your shower head. Spritz a cloth with glass cleaner to reveal a spotless, shiny surface.
Conclusion
Cleaning and maintaining your shower head is essential for better performance and bathroom sanitary ware reasons because it conceals dirt, bacteria, and mineral deposits.